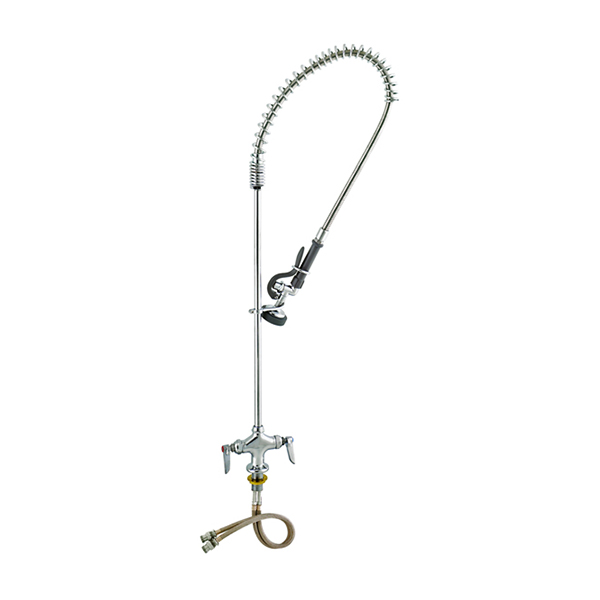
The T&S Brass B-0113 Pre-Rinse Faucet Assembly is a highly popular, commercial-grade pre-rinse unit designed for durability, flexibility, and high-volume performance. It features a single-hole deck mount mixing faucet with a polished chrome-plated brass body, a 24″ riser, a 44″ flexible stainless steel hose with heat-resistant handle, and a 1.15 GPM spray valve for efficient rinsing. The unit is equipped with compression cartridges with spring checks, lever handles, 18″ flexible stainless steel supply hoses, a spray valve holder, and an overhead spring for smooth operation and easy maneuverability.
This model is most commonly used in commercial kitchens, restaurants, institutional cafeterias, hospitals, schools, and food service preparation areas where fast, reliable dish and sink pre-rinsing is essential. Known for its rugged construction and ease of maintenance, it is one of the most widely installed pre-rinse systems in the foodservice industry.
Rated for pressures from 20 to 125 psi, temperatures from 40°F to 140°F, and compliant with ASME A112.18.1/CSA B125.1, NSF 61-Section 9, NSF 372, and 2019 DOE PRSV Class II, this unit is built for consistent performance in demanding environments.
The T&S Brass B-0113 Pre-Rinse Faucet Assembly is a highly popular, commercial-grade pre-rinse unit designed for durability, flexibility, and high-volume performance. It features a single-hole deck mount mixing faucet with a polished chrome-plated brass body, a 24″ riser, a 44″ flexible stainless steel hose with heat-resistant handle, and a 1.15 GPM spray valve for efficient rinsing. The unit is equipped with compression cartridges with spring checks, lever handles, 18″ flexible stainless steel supply hoses, a spray valve holder, and an overhead spring for smooth operation and easy maneuverability.
This model is most commonly used in commercial kitchens, restaurants, institutional cafeterias, hospitals, schools, and food service preparation areas where fast, reliable dish and sink pre-rinsing is essential. Known for its rugged construction and ease of maintenance, it is one of the most widely installed pre-rinse systems in the foodservice industry.
Rated for pressures from 20 to 125 psi, temperatures from 40°F to 140°F, and compliant with ASME A112.18.1/CSA B125.1, NSF 61-Section 9, NSF 372, and 2019 DOE PRSV Class II, this unit is built for consistent performance in demanding environments.
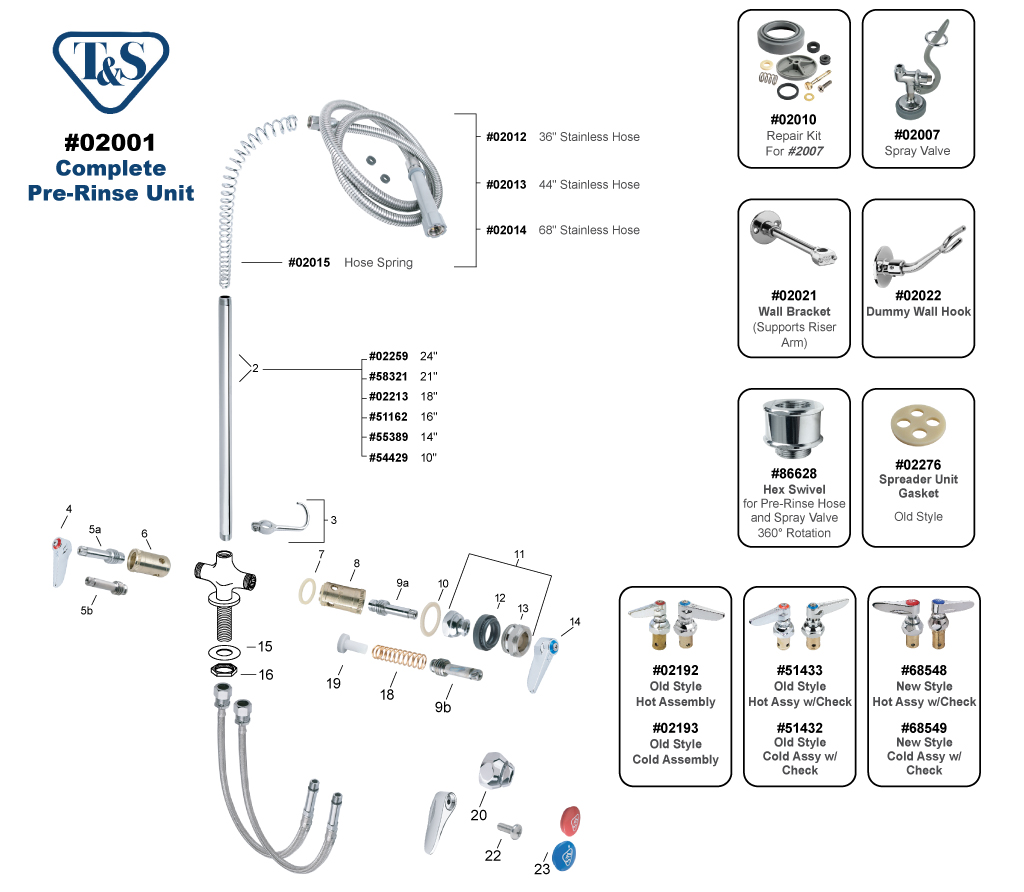
T&S Brass B-0113 Photographic Parts Breakdown
Review the parts breakdown of the B-0113 Pre-Rinse Faucet Assembly by T&S Brass then scroll down and click the part number of the item(s) you need to repair your faucet. (Note: If an item is not linked, we still carry it, but it is not listed on our website. You must call us to order those parts).
Non-Numbered Items Listed Above
Installation Instructions and FAQS
The T&S Brass B-0113 EasyInstall® Pre-Rinse Unit is designed for fast, secure installation with a spring-action design, single-hole base, and 18″ flex lines for improved reach and flexibility. This model includes the B-0107 spray valve (our Part #02007) and features the EasyInstall® system to simplify setup while ensuring a stable, leak-resistant connection.
Please read all instructions carefully before beginning installation. Proper installation is essential for optimal performance, durability, and warranty compliance.
T&S Brass B-0113 Installation Instructions
Step 1: Insert the flex line inlets and tighten them by hand. Apply plumber’s putty to the underside of the faucet body, insert the body into the mounting hole, and tighten the locking nut with a wrench.
Step 2: Apply plumber’s tape to the top of the riser threads. Attach the riser to the spring assembly and tighten with a wrench.
Step 3: Make sure the EasyInstall® locking washer is properly seated inside the faucet body.
Step 4: Grasp the riser assembly and lower the EasyInstall® end fitting into the faucet body. Press down until the end fitting “pops” into place.
Step 5: Lock the EasyInstall® locking nut into place and tighten it with a wrench.
Q: What parts break most often in pre-rinse faucets?
A: In commercial pre-rinse faucets like the T&S Brass B-0113 Pre-Rinse Faucet Assembly, the most common wear-and-fail components are those exposed to constant movement, pressure, and heavy daily use.
The most frequently replaced (wearable) parts include:
- Spray valve – especially internal seals, triggers, and flow components from repeated use
- Hose assembly – flexing, stretching, and constant movement can eventually lead to leaks or cracking
- Hose fittings and O-rings – prone to wear and minor leaks over time
- Spray head components – gaskets and internal seals that degrade with use
- Swivel joints and spring components – can loosen, stiffen, or lose tension over time
Important installation/maintenance note:
One advantage of this unit is that replacing most of the wearable components in this unit does not require shutting off the water supply, making it especially convenient for commercial kitchens and high-use environments where downtime needs to be minimized.
This makes hose replacement and routine maintenance significantly faster and less disruptive compared to many traditional pre-rinse setups.
Q: How do I replace the hose on a pre-rinse faucet?
A: Hose replacement on the T&S Brass B-0113 Pre-Rinse Faucet Assembly is designed to be straightforward and can typically be done without shutting off the water supply, which is ideal for commercial kitchens. The 18-inch Flex Supply Hoses come in a pack of two. The replacement hoses for the B-0113 Faucet are T&S Brass model 012534-45, our Part #56687 18″ Flex Supply Hoses.
Follow these steps:
- Ensure the spray valve handle is turned off and no water is flowing. The water supply does not need to be shut off.
- Slide the spring upward to expose the hose assembly.
- Use a wrench to loosen the nut at the spring body and remove the hose assembly.
- Once disconnected from the riser, carefully remove the hose from the spring.
- Remove the spray valve from the handle end. If needed, loosen it with a wrench before fully unthreading.
- Set the hold-down ring aside, then slide it onto the new hose handle before reinstalling the spray valve.
- Feed the new hose back through the spring assembly.
- Reattach the hose to the spring body and tighten the nut securely with a wrench.
- Slide the spring back into its original position over the spring body and ensure proper alignment.
- Turn the water on and inspect all connection points for leaks, especially around the spring body and spray valve.
This process helps restore full hose performance while minimizing downtime in high-use commercial environments.
Q: How can I reduce stress on the spray valve hose?
A: One of the best ways to reduce wear and stress on the spray valve hose in a T&S Brass B-0113 Pre-Rinse Faucet Assembly is to install a spray valve swivel. This is Part #86628 Hex Swivel listed in the Parts Breakdown above. This allows the hose to rotate more freely during use, helping prevent twisting, kinking, and premature hose failure.
Q: How do I install a spray valve swivel on the hose?
A: Follow these steps:
- Shut off the spray valve and confirm no water is flowing.
- Loosen the handle assembly from the hose carefully, being cautious not to scratch or damage the hose barrel.
- Remove the old washer, then install one of the replacement washers and attach the new swivel to the hose barrel using a 5/16″ Allen wrench.
- Install the second replacement washer in place.
- Reconnect the handle assembly by attaching it to the new swivel and tightening securely.
- Turn the water back on and inspect all connection points for any leaks around the new swivel.
This upgrade helps extend the life of the hose and spray valve by reducing torsional stress during daily commercial use.
Q: How do I replace the spray valve on a T&S Brass pre-rinse faucet?
A: Replacing the spray valve on a T&S Brass B-0113 Pre-Rinse Faucet Assembly is a quick maintenance task that can typically be completed in just a few minutes.
Follow these steps:
- Make sure the faucet handles are turned off and no water is flowing from the spray valve.
- Note: The replacement process differs slightly depending on the spray valve model:
- B-0107: The handle assembly remains in place during replacement.
- B-0108: The handle assembly (included with the original spray valve) must be removed before installing the new spray valve.
- Using an adjustable wrench, remove the existing spray valve and washer.
- Install the new replacement washer, then thread the new spray valve onto the hose and tighten it securely.
- Turn the water back on and inspect the connection around the new spray valve for any leaks.
Replacing a worn spray valve helps restore proper spray performance, prevent leaks, and extend the service life of your pre-rinse faucet.
The B-0107 Pre-Rinse Spray Valve is our Part #02007. Other variations of this T&S spray valve are also available and include the following:
• T&S Brass EB-0107 Pre-Rinse Spray Valve with a Hi-Flow Face – Part #86377
• T&S Brass B0107J Pre-Rinse Spray Valve with Low Flow Spray Tip – Part 67003
• T&S Brass B-0107C with Fan Jet/Knife Action – Part #02317
The B-0108 Pre-Rinse Spray Valve is our Part #58677.
Q: What is the difference between the T&S Brass B-0107 and B-0108 spray valves?
A: The T&S Brass B-0108 spray valve is basically an upgraded version of the B-0107 spray valve. They are interchangeable on most T&S Pre-Rinse Faucets because they thread into the same 7/8″-20 male inlet hose connection. The B-0108 is the newer JeTSpray replacement for the B-0107. JeTSpray® is T&S Brass’s proprietary spray valve technology designed to deliver a stronger, more effective spray while using less water (1.07 GPM vs. 1.15 GPM) and requiring less trigger force than older spray valves like the B-0107.
Q: How do I replace the spray face on a T&S Brass pre-rinse spray valve?
A: Replacing the spray face is a simple maintenance task that can improve spray performance and replace worn or damaged components without changing the entire spray valve.
Follow these steps:
- Make sure the faucet handles are turned off and no water is flowing to the spray valve.
- Using a Phillips screwdriver, remove the center screw and take off the existing spray face.
- Install the new spray face and rubber bumper, then secure them to the spray valve with the center screw. Do not overtighten, as excessive force can crack the spray face or cause leaks.
- Turn the water back on and inspect the spray valve for any leaks or improper spray patterns.
Replacing the spray face is an easy, cost-effective way to restore proper spray performance and extend the life of your pre-rinse spray valve.
Need a new spray face? If your spray face is damaged or worn, the B-10K Parts Kit for B-0107 Spray Valves includes a replacement spray face along with the internal valve components needed to restore proper operation and spray performance.
The kit includes:
- Brass valve stem and plastic spray face
- Spray face and components to ensure proper GPM output
- Valve stem, spring, washers, and packing seal
The B-10K Parts Kit is our Part #02010