Flushometer Parts and Units, Washroom
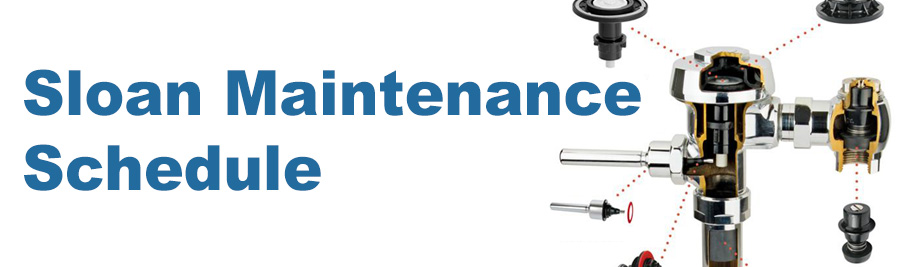
Sloan Maintenance Schedule
How Does a Sloan Royal Flushometer Work?
Diaphragm Assembly
 Water sits inside two chambers in the valve body – the upper and lower chambers. When a flushometer is idle, the pressure in the upper chamber is greater than the pressure in the lower chamber due to its greater surface area. This keeps the diaphragm pushed down against the valve seat, and prevents any water from flowing down into the valve. When the handle is pulled, a plunger inside the handle assembly pushes against the bottom part of the relief valve stem. This causes the relief valve to push the diaphragm up and release the pressure. As a result, the water in the chambers flows down into the valve and then into the toilet or urinal. The volume of water that is released is determined by the type of diaphragm assembly in the valve. Once the flush is initiated and water flows out of the valve, water from the supply line begins to fill the valve chambers again. A small bypass hole in the diaphragm allows that water to flow into the upper chamber. As the water pressure in the upper chamber begins to build, it gradually pushes the diaphragm back down onto the valve seat. Once the diaphragm lowers back onto the valve seat and the upper chamber is sealed, the flow of water from the inlet stops. The valve is now ready for the next flush.
If your flushometer won’t shut off and continues to flush, it could be because there is dirt or debris blocking the bypass hole. Watch this video to learn how to clean the diaphragm. Over time, the diaphragm will eventually wear out, and will need to be replaced. Permex diaphragms last up to four times longer than the old rubber diaphragms. Sloan has been installing Permex diaphragms in its Royal flushometers since 1998, when it introduced the dual-filtered bypass assembly. The dual-filtered bypass filters the water twice before it reaches the bypass hole, which greatly reduces the possibility of dirt or debris clogging the hole. Using dual-filtered bypass assemblies will also cut down on the time spent servicing a Sloan Royal flushometer. Dual-filtered bypass assemblies only come installed on Royal Flushometers, not Regal. However, when the time comes to replace your diaphragm assembly, dual-filtered bypass replacement kits can be installed in Royal or Regal flushometers.There are many different diaphragm kits available with different GPFs (gallons per flush) for different Sloan Flushometers. Visit our Sloan Manual Parts page to see which one will work for your valve.Inside Cover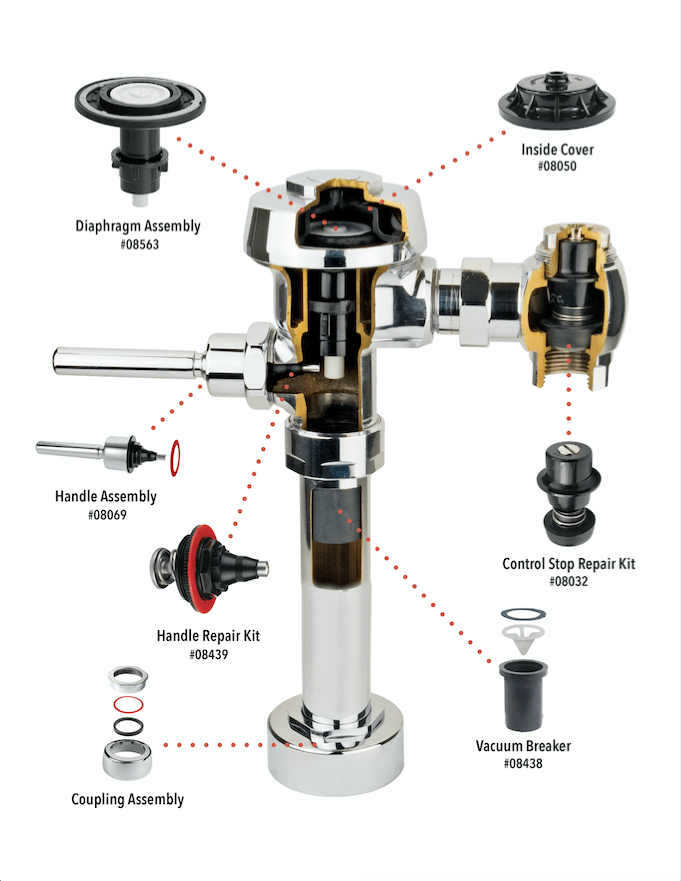 The hard plastic Inside Cover serves as a barrier between the diaphragm and the outside metal cover, and helps to seal the upper chamber of the valve. If a crack develops in the cover, it breaks the seal and disrupts the pressure, and so it will result in non-stop flushing, or water leaking around the outside cover. Order part #08050 to get your valve back in proper working order. Life expectancy is five to seven years.Control StopThe Control Stop is where water flows into the valve from the supply line. You can turn the water on and off by removing the stop cap, and turning the stop screw clockwise or counterclockwise until it can’t turn anymore. You can also control the water pressure by turning the screw to a position between full on or full off. If water is splashing out of the fixture, reduce the water pressure by turning the screw clockwise. If there is not enough water flowing to adequately flush the fixture, then turn the screw counterclockwise. There are many types of control stops and stop repair kits available.Handle AssemblyThe Handle Assembly is what initiates a flush. When the handle is pulled, the plunger inside the assembly is pushed into the relief valve, which raises the diaphragm and releases the water from inside the valve. Handle assemblies have a life expectancy of four to six years, depending on usage. If you begin to see leaks around the handle, or if the handle is sagging, you probably need to repair your handle assembly. For Royal, order Sloan Handle Repair Kit #08439, and for Regal, order part #08007. For a complete Sloan Handle Assembly, order part #08069 for Royal, and #08008 for Regal.Vacuum Breaker
 The job of the Vacuum Breaker is to make sure all of the water is eliminated from the tube during a flush, and prevent water from flowing back up the pipe and contaminating the water supply. During a flush, water flows down through the black rubber part of the vacuum breaker. But if the water were to flow back up the tube, the design of the rubber part closes off and doesn’t allow water to flow through it in the opposite direction of the flush. To prevent water from staying in the tube, there are vent holes at the top that allow air to flow into the tube. This breaks the vacuum and lets all of the water flow out of the tube into the fixture. Over time, the rubber part of the vacuum breaker will deteriorate, and you will notice water leaking out of the tube from the vent holes under the nut. When this happens, it’s time to get a Vacuum Breaker Repair Kit. For Royal, order #08438, and for Regal, order #08012.
Coupling AssemblyThe Coupling Assembly connects the flushometer to the spud in the closet or urinal. If you notice water leaking in this area, then it’s time to replace the coupling gaskets. If the chrome on your coupling is also worn, you can order a complete Coupling Assembly. All of these parts are available in sizes 3/4″, 1-1/4″, and 1-1/2.”
Sloan Repair Kits
As you can see, a Sloan Manual Flushometer has many parts that must work together in harmony to keep it functioning properly. While Sloan does manufacture high-quality parts and units, many of those parts are not meant to last forever and will need to be replaced in time. How soon you will need to replace those parts depends on how often the flush valve is used. In response to plumbers who like to be prepared for any situation, Equiparts has created two Sloan Master Repair Parts Kits that contain just about anything you would ever need to repair a Sloan manual flushometer. These kits are a great way to be prepared for any situation when you are repairing a Sloan flush valve. They are a must have for any plumber or maintenance man who services a building or facility that utilizes a large number of Sloan flushometers. Our most popular kit is the #08066, A 101 piece kit that contains parts for Regal and older Royal flush valves. We also have kit #08730, a 71 piece kit for newer Sloan Royal flush valves that use the dual-filtered bypass. You can order them by clicking on their part numbers in this article, or as always, you can give us a call at 800-442-6622 if you have any questions. Our technical experts will be happy to help you.